

因为想要在无GNSS的情况下实现无人机Position模式的飞行,就得为飞控实时提供一个状态/位置估计,可以是激光或者视觉里程计。这次先用深度相机做个视觉里程计因为还没有买激光雷达恼(补充:当这篇推文发布时,其实已经买mid-360了)。本来还想配合飞控的IMU数据的但是一直失败所以这篇纯视觉了悲。
- 仿真配置:惠普暗影精灵11台式(i7,5060ti)、Ubuntu 22.04 LST、ROS2 Humble、PX4 1.16.0、Gazebo Harmonic;
- 实机配置:650轴距机架、Pixhawk 6c mini(PX4 1.16.0)、轮趣Orbbec双目结构光深度相机(无IMU)、Jetson Orin NX Super 16G(JetPack 6 / Ubuntu 22.04 LST、ROS2 Humble)。
(注:不包含ROS2和RTAB-Map安装步骤)
仿真
仿真的前置技术(包括仿真平台基础搭建、理解世界场景与传感器、无人机模型等是什么样的以及如何自定义构建),参考下面两篇文章:
为了与自己实际的设备统一,改下仿真深度相机的参数,其在设备的配置文件中表现为camera和depth_camera两个传感器,分别提供彩色和深度图话题。这里把图像尺寸都改成640*400,视场角FOV也统一为1.185,这样后面就不需要再多做个对齐。买的便宜相机的深度图有效范围实际上只到2.5米(恼好低),这在后面使用里程计时会体现为特征点完全不够而SLAM中断,所以这里为了方便先直接设个20米(恼好高,变成激光雷达了)。顺便给彩色图加了<topic>color</topic>标签,之后用ros2方便一点。
      <sensor name="IMX214" type="camera">
        <pose>0.01233 -0.03 .01878 0 0 0</pose>
        <camera>
          <horizontal_fov>1.185</horizontal_fov>
          <image>
            <width>640</width>
            <height>400</height>
          </image>
          <clip>
            <near>0.1</near>
            <far>100</far>
          </clip>
        </camera>
        <always_on>1</always_on>
        <update_rate>30</update_rate>
        <visualize>true</visualize>
        <topic>color</topic>
      </sensor>
      <sensor name="StereoOV7251" type="depth_camera">
        <pose>0.01233 -0.03 .01878 0 0 0</pose>
        <camera>
          <horizontal_fov>1.185</horizontal_fov>
          <image>
            <width>640</width>
            <height>400</height>
            <format>R_FLOAT32</format>
          </image>
          <clip>
            <near>0.25</near>
            <far>20</far>
          </clip>
        </camera>
        <always_on>1</always_on>
        <update_rate>30</update_rate>
        <visualize>true</visualize>
        <topic>depth</topic>
      </sensor>
然后是开启仿真,创建tf坐标树转换与gz话题桥接,下面的每句指令都需要单独一个terminal。实际上可以整合为一个python的launch文件来启动,但是仿真上我还没写,后面的实机章节用的就是launch脚本了,然而实际也不用手动开这么多转换和桥接就是了。
PX4_GZ_MODEL_POSE=-17.7,3.2,1.4,0,0,0 PX4_GZ_WORLD=historyM make px4_sitl gz_x500_livox  # 是之前文章中自定义的整机

ros2 run tf2_ros static_transform_publisher .12 .03 .242 0 0 0 base_link x500_livox_0/camera_link/IMX214

ros2 run tf2_ros static_transform_publisher .12 .03 .242 0 0 0 base_link x500_livox_0/camera_link/StereoOV7251

ros2 run ros_gz_bridge parameter_bridge /color@sensor_msgs/msg/Image@gz.msgs.Image

ros2 run ros_gz_bridge parameter_bridge /depth@sensor_msgs/msg/Image@gz.msgs.Image

ros2 run ros_gz_bridge parameter_bridge /camera_info@sensor_msgs/msg/CameraInfo@gz.msgs.CameraInfo
启动rtab:
ros2 launch rtabmap_launch rtabmap.launch.py \
    rtabmap_args:="--delete_db_on_start" \
    rgb_topic:=/color \
    depth_topic:=/depth \
    camera_info_topic:=/camera_info \
    frame_id:=base_link \
    approx_sync:=true \
    use_sim_time:=true \
    topic_queue_size:=100 \
    sync_queue_size:=100 \
    wait_for_transform:=0.2 \
    visual_odometry:=true \
    rtabmap_viz:=true \
    rviz:=false
下面这样就成功了,地图、路径等数据会被记录到~/.ros/rtabmap.db中。
实机
实机使用的深度相机与之前这篇文章相同。
比较坑的是,卖家给的手册教了怎么给彩色图话题尺寸(640*480)匹配并修改得跟深度图(640*400)一致,然而照做之后导致我很长时间以来实机rtab都跑不出建图来,最后发现是因为那个修改,彩色图话题跟相机内参话题冲突了……已没招。而rtab其实并不要求color和depth形状完全一致所以改回去就好。
接下来在实机的jetson上写启动代码。我放在了自己创建的slam功能包的launch文件夹下。
import os
from launch import LaunchDescription
from launch.actions import IncludeLaunchDescription
from launch.launch_description_sources import PythonLaunchDescriptionSource
from launch_xml.launch_description_sources import XMLLaunchDescriptionSource
from launch_ros.actions import Node
from ament_index_python.packages import get_package_share_directory

def generate_launch_description():

    # 1. 启动 Astra 相机 (使用 XML Launch)
    astra_camera_launch = IncludeLaunchDescription(
        XMLLaunchDescriptionSource(
            os.path.join(get_package_share_directory('astra_camera'), 'launch', 'gemini.launch.xml')
        )
    )

    # 2. 相机坐标转换 (Static TF)
    static_tf_node = Node(
        package='tf2_ros',
        executable='static_transform_publisher',
        name='base_to_camera_tf',
        # ROS 2 static_transform_publisher 格式: x y z roll pitch yaw frame_id child_frame_id
        arguments=['0.11', '0', '-0.025', '0', '0', '0', 'base_link', 'camera_link']
    )

    # 3. 启动 RTAB-Map 视觉惯性里程计
    # 处理 '~' 路径,将其展开为绝对路径
    database_path = os.path.expanduser('~/WushanPilot/src/slam/rtabmap.db')

    rtabmap_launch = IncludeLaunchDescription(
        PythonLaunchDescriptionSource(
            os.path.join(get_package_share_directory('rtabmap_launch'), 'launch', 'rtabmap.launch.py')
        ),
        launch_arguments={
            'rtabmap_args': '--delete_db_on_start',
            'rgb_topic': '/camera/color/image_raw',
            'depth_topic': '/camera/depth/image_raw',
            'camera_info_topic': '/camera/color/camera_info',
            'frame_id': 'base_link',
            'approx_sync': 'true',
            'wait_for_transform': '0.3',
            'visual_odometry': 'true',

            'topic_queue_size': '100',
            'sync_queue_size': '100',

            'qos': '1',
            'qos_camera_info': '1',
            'qos_image': '1',
            'qos_depth': '1',

            'database_path': database_path,
            'rtabmap_viz': 'false',
            'rviz': 'false'
        }.items()
    )

    # 汇总所有启动项并返回
    return LaunchDescription([
        astra_camera_launch,
        static_tf_node,
        rtabmap_launch
    ])
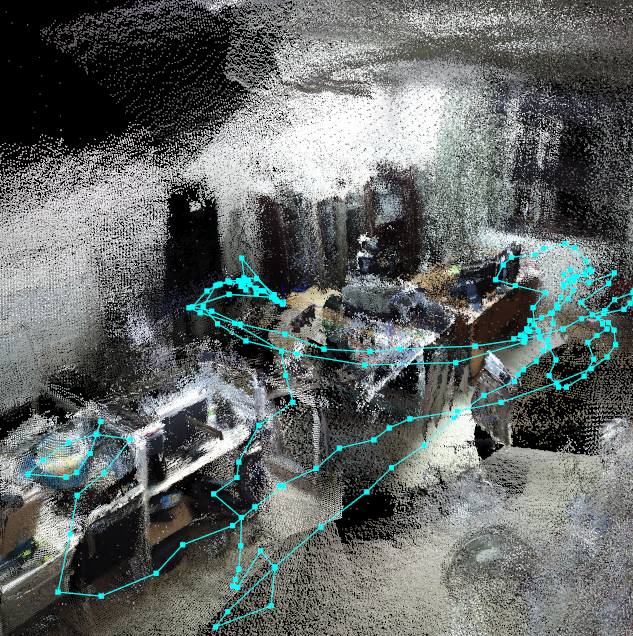
再使用colcon编译这个包后就能ros2 launch slam xxx.py即可启动slam。注意使用launch是需要修改功能包中setup.py内容的,具体网上有很多教程。目前只是在办公室里手拿着无人机做的定位和建图,在实际户外飞的时候还遇到了很多问题,主要深度相机的性能还是不太够。
可恶这篇发布得实在好晚。只能说洛克王国太好玩以及本站长最近遇到的好事以至于把博客忘得一干二净了。下一篇大概是Livox Mid-360S激光雷达相关的,甚至用Fast-lio2来状态估计什么的吧。


还有联动汇总篇,而且好事不和大家分享还是太坏了
下篇能不能评测一下直视激光雷达会发生什么
什么都不会发生(真的)
那试试超频
好吧应该叫过载,超压,恼反正加大功率
可恶其实已经知道结果了,但是就像会想办法把电热偶变成电冰箱一样好
哇试试评论能有几个层级
恼刚有想法就触底了
就像八六的科盐生涯一样